How to Build a Custom WordPress Widget
WordPress Widget is a super user-friendly drag and drop tools that it can let you add elements anywhere in the site. The elements could be simple text editor or PHP made custom widgets that have various functions like social share button, contact form etc. The question is where to add a widget? Before dropping the widget elements, you need to register sidebar first. WordPress register_sidebar function will let you create sidebars. Now it’s time to create WordPress widget. See below articles.
How to Build a Custom WordPress Widget step by step
You can execute codes in functions.php if it is not complex. Otherwise, make a plugin (see how to make plugins here) or write codes in themes library in a folder that can be called from the functions.php. If you are a PRO, then it will be so easy for you. Here I will add codes in functions.php
First, add these codes in functions.php then later I will explain codes.
class mwp_wid extends WP_Widget{

	function mwp_wid(){
		parent::WP_Widget(false, $name = "MWP Test Widgets");
	}

	function form($instance){


		$name = esc_attr($instance['name']);
		?>

	    <p>

        <label for="<?php echo $this->get_field_id('name'); ?>"><?php _e('Your Name:'); ?></label>

        <input id="<?php echo $this->get_field_id('name'); ?>" name="<?php echo $this->get_field_name('name'); ?>" type="text" value="<?php echo $name; ?>" />

	    </p>

		<?php

	}

	function update($new_instance,$old_instance){

		$instance = $old_instance;
		$instance['name'] = strip_tags($new_instance['name']);

		return $instance;
	}

	function widget($args, $instance) {

			extract( $args );

			// these are the widget options
			$name = $instance['name'];


			echo $before_widget;


			// Check if options are set

			if( $name ) {
				echo '<p class="wp_widget_plugin_textarea" style="font-size:25px;">'.$name.'</p>';
			}

			echo $after_widget;
	}

}

add_action('widgets_init', create_function('', 'return register_widget("mwp_wid");'));
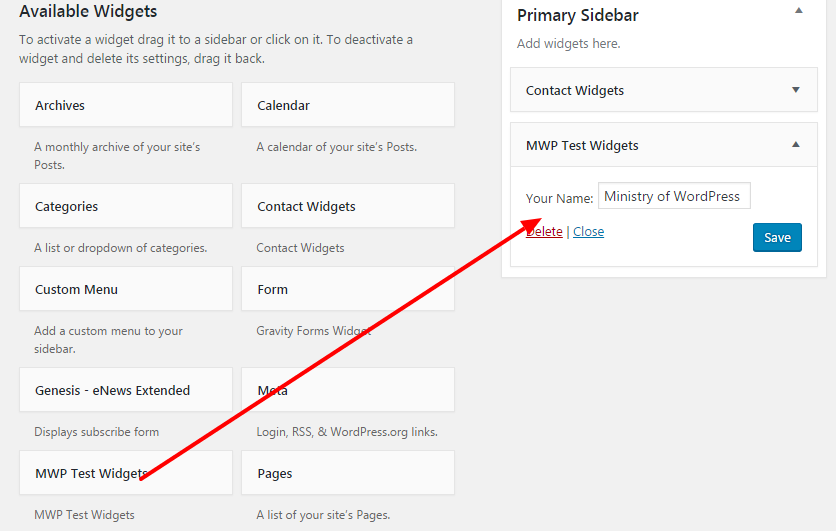
After adding these codes, you will see the widget in Dashboard > Appearance > Widgets. Now, add this widget in any widget area.

As I added this widget in the sidebar area, you can see the “name” in the sidebar. It’s just a simple example. I am going to explain the codes now.

Code Explanation
To create a WordPress widget, you need to extend WP_widget and its functions. You will see more about Widget API here. In the above codes, I used PHP inheritance class techniques. There are 3 functions in the class to make a widget. WordPress functions Form(), update() and widget() are generally used for Widget. So, let’s see what we used and why.
class mwp_wid extends WP_Widget{

	function mwp_wid(){
		parent::WP_Widget(false, $name = "MWP Test Widgets");
	}
......
As I said you need to use inheritance class to create widget within. A class name/ID called mwp_wid just extends WordPress default WP_Widget. Then you need to add a constructor mwp_wid() that must be the same name as the class name. In this constructor function, Widgets name can be defined.
function form($instance){


		$name = esc_attr($instance['name']);
		?>

	    <p>

        <label for="<?php echo $this->get_field_id('name'); ?>"><?php _e('Your Name:'); ?></label>

        <input id="<?php echo $this->get_field_id('name'); ?>" name="<?php echo $this->get_field_name('name'); ?>" type="text" value="<?php echo $name; ?>" />

	    </p>

		<?php

	}
The form() function will let you add the elements that you want to show in Widget body. It can be form, text, links whatever. You need to use a predefined function called form() that create the widget in the WordPress administration.
function update($new_instance,$old_instance){

		$instance = $old_instance;
		$instance['name'] = strip_tags($new_instance['name']);

		return $instance;
	}
The update() function should check that $new_instance is set correctly. The newly-calculated value of $instance should be returned. If false is returned, the instance won’t be saved/updated. When you click on the widget form “save” button, then predefiend widget() function is called. Then it overrides previous value with new one.
function widget($args, $instance) {

			extract( $args );

			// these are the widget options
			$name = $instance['name'];


			echo $before_widget;


			// Check if options are set

			if( $name ) {
				echo '<p class="wp_widget_plugin_textarea" style="font-size:25px;">'.$name.'</p>';
			}

			echo $after_widget;
	}
The widget() function echos widget content. This function contains two parameters $args and $instance. The $args is an associative array that will be passed as a first argument to every active widget callback. The $instance just instances its variable.
add_action('widgets_init', create_function('', 'return register_widget("mwp_wid");'));
Now, it’s the way to register widget. register_widget() function will let you do that.
Conclusion
In this WordPress widget tutorial, I have just worked on one field ‘name’. You can extend adding some extra fields as your wish to create a custom widget.
